In the harsh realities of cold climates, it is essential that structures are built not only to keep the inhabitants comfortable but also to withstand the challenges posed by moisture condensation, which can often occur within the wall assembly.
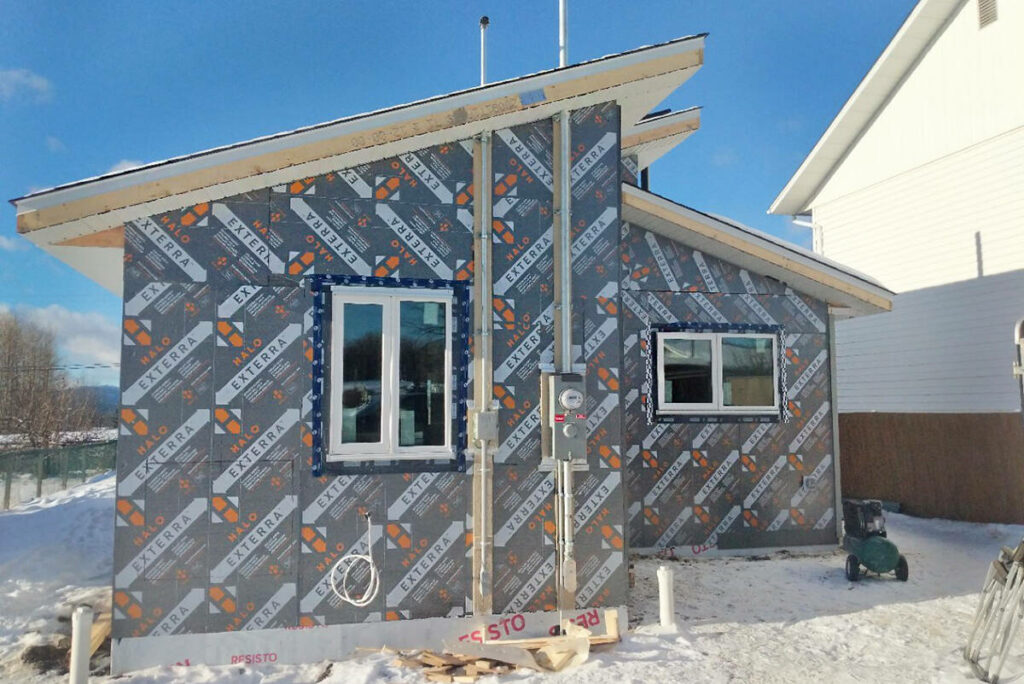
An integral step in this process is calculating the correct thickness of exterior continuous insulation, such as Halo Exterra, that will be required to ensure the dew point remains on the exterior surface of the weather resistant barrier located on top of the wood sheathing.
In this article, we will walk you through the detailed process of achieving this, step by step.
Understanding the Dew Point
Before we delve into calculations, it’s crucial to understand the science behind the dew point.
The dew point is the temperature at which air surpasses 100% saturation and the additional moisture beyond 100% is shed in the form of condensation . Within a wall assembly, this can lead to problems such as mold growth and structural deterioration.
Therefore, it is vital to strategically place the dew point at the exterior surface of the weather resistant barrier, where condensation from air leakage won’t compromise the integrity of the wall assembly.
Tools and Preparations
For a successful calculation, gather necessary information including a dew point calculator (or build your own in an Excel file, it’s straight forward), local climate data, and the material specifications of your wall assembly components. Also, familiarize yourself with building codes and insulation standards relevant to your region to ensure compliance with the minimum standard
Step 1: Gathering Critical Data
Climate Analysis
Start by collecting the climate data of your region. Obtain the average yearly interior and exterior design temperatures and relative humidity. This data can often be found in the local building codes. This data will play a crucial role in determining the insulation thickness.
Material Properties
Understand the properties of the materials involved in your wall assembly, including the interior and exterior air films, gypsum board, insulation between the studs (if present), exterior sheathing, and continuous insulation…etc. .
Focus on attributes such as thermal resistance or conductivity. The R-value of Halo Exterra is R-4.7/inch, or alternatively expressed as R-5/nominal inch (1.06”).
Step 2: Insulation Thickness Calculation
Utilizing Dew Point Calculators
Using a dew point calculator, input the gathered climate and material data to calculate the required insulation thickness to avoid the wrong location of the dew point. Many online tools and software can perform these calculations with high accuracy or your trusted materials manufacture such as Logix Brands can assist!
Establishing Indoor Conditions
For the calculations, consider the indoor conditions you aim to maintain. Typically, these might be around 70°F (21°C) with 40-60% relative humidity during winter months.
Step 3: Setting Up the Wall Assembly Model
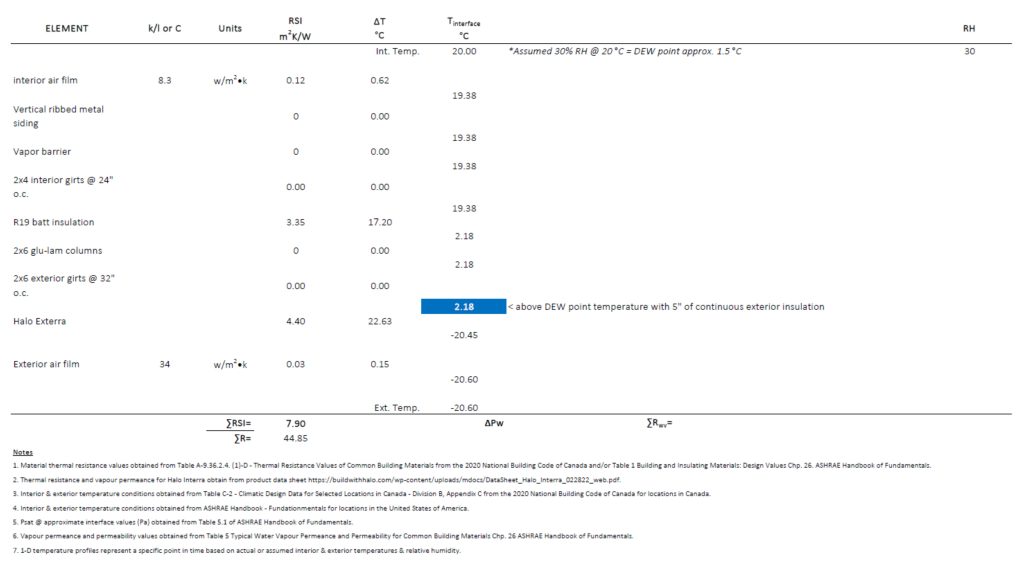
Setup a spread sheet in Excel with the headings noted in Figure 1. List each element in the wall assembly, including Halo Exterra, along with it’s thermal resistance. Note, thermal resistance can also be calculated based on a material’s thermal conductivity.
Step 4: Simulating the Dew Point Position
Run simulations to determine where the dew point will occur within the wall assembly. Adjust the interior and exterior insulation thickness iteratively to achieve the desired position at the exterior surface of the weather resistant barrier.

Don't miss a thing!
Subscribe for exclusive content, insider industry news and limited edition webcasts.
Step 5: Documentation and Future Reference
Document your findings meticulously for future reference and to create a knowledge base that can be utilized in future projects.
Conclusion
Calculating the correct thickness of your layer of Halo Exterra is a vital step in ensuring the long-term durability of a building’s structure in a cold climate. It involves a detailed analysis of climate data, careful selection and understanding of materials, and iterative simulations to achieve the optimal result.
As a builder, embracing a scientific and methodical approach will not only help in achieving structures that are resilient and efficient but will also help reduce callbacks and potential claims caused by unwanted condensation build up.
Armed with these insights and tools, you are well-equipped to undertake projects that stand the test of time, offering a safe and healthy abode to your customers.

