Over-slab insulation is common in retrofits in northern climate zones because it allows homeowners to insulate their slabs without ripping them out. Typically, in such applications, a 1.5-inch layer of rigid insulation goes on top of an existing slab-on-grade before you install the new subflooring.
But did you know that the same approach can work very well in new construction as well?
Placing high-performance insulation, such as Halo Interra, on top of a slab-on-grade creates a warmer, softer floor, facilitates hardwood flooring placement, improves energy performance, and allows you to down-set doors.
In the post below, we will discuss the benefits of over-slab insulation in new construction and explain what a typical over-slab insulation detail looks like.
What are the Advantages of Over-Slab Insulation in a Slab-on-Grade Application?
The advantages of over-slab insulation on a slab on grade include greater comfort, hardwood compatibility, and ensuring an effective thermal break. We take a more detailed look at these benefits below.
1. Warm and Comfortable Floor
Placing insulation on top of a concrete slab interrupts the heat’s path down to the concrete, thus allowing the floor to preserve its warmth. This strategy ensures occupants’ comfort whether you’re building in cold, northern climate zones or in milder regions, where a slab-on-grade might still get too chilly for comfort in the winter months.
What’s more, a slab that’s insulated over top feels softer under your feet.
Even though the insulation layers afford an impressive degree of compressive strength, the foam is a far more effective shock absorber than concrete. This makes it much easier to install hardwood flooring, as you don’t need to worry about having two hard surfaces without a soft barrier between them.

2. Complete Thermal Break
When installed properly (more on this below), insulation panels such as Interra can provide an uninterrupted layer of continuous insulation beneath the floor. This continuous insulation layer leaves no room for heat to escape to the cold concrete below (as heat travels from warm to cold), thus giving a significant boost to the home’s energy efficiency.
3. Allows You to Down-set Doors
Applying insulation to the top of a concrete slab-on-grade allows you to down-set doors. You can limit the threshold elevation substantially, in most cases to just a ¼-inch. However, note that this method does not work with doors that need to swing over a rug, so you’ll still need to ensure a sufficiently high threshold for such door openings.
Typical Over-Slab Insulation Detail at a Slab on Grade
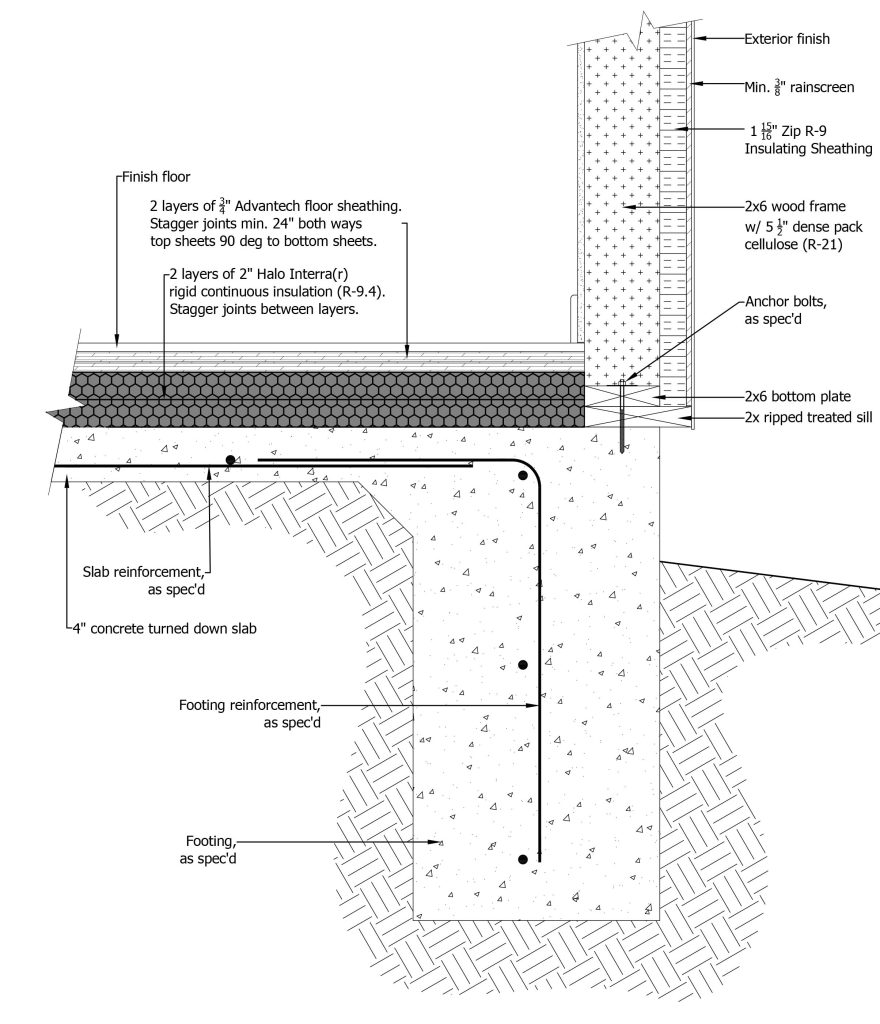
The typical over-slab insulation detail consists of the following components:
- Two layers of insulation, taped
- Two layers of subflooring
- Flooring finish
Below, we’ll walk you through a typical over-slab insulation detail and explain the best practices for installation.
1. Two layers of insulation
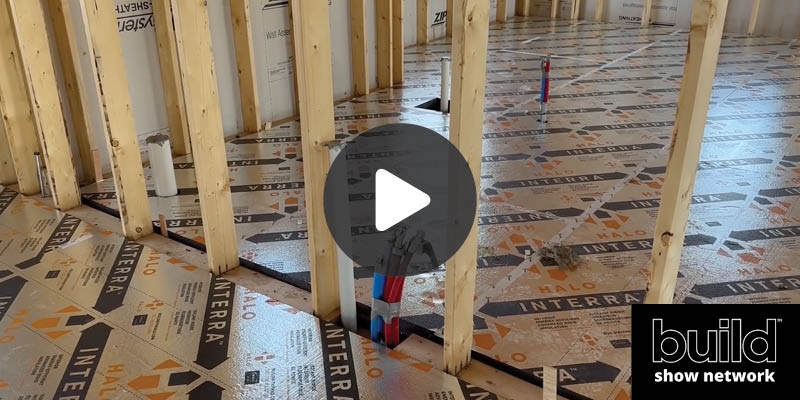
The high-performance insulation product, such as Interra, goes directly on to the slab, and preferably in two layers.
When you install the insulation, be sure to offset the first and second layers, such that the joints between the panels do not sit directly on top of one another. Having two layers of offset insulation panels protects the home’s energy performance in two ways:
- The offset prevents energy loss through the joints: If the joints are somewhat loose, no major heat leak will occur because the joint sits on top of a panel’s surface, not another joint.
- Second layer prevents energy loss: The second layer of insulation is your insurance policy against punctures made to the first layer beneath the subflooring. Since the subflooring layers get glued and fastened together, there’s a chance that the screws will puncture the insulation’s vapor barrier. However, having yet another, intact insulation layer beneath mitigates the risk of energy loss posed by the punctures.
Crucially, the insulation panels that sit atop the concrete slab should be adequately taped to ensure a continuous vapor barrier. The second layer may be taped with a simple tape product that offers good bonding strength, such as Tyvek tape.
2. Two layers of a subflooring product
On top of the Interra insulation, you’d place your subflooring product, such as Advantec, also in two layers, and also with an offset. In fact, the first subflooring layer should be installed somewhat loosely from the perimeter to allow some room for expansion and contraction.
The two layers of the subfloor should then be glued and screwed together in an 8-inch on-center pattern. The subflooring is ¾-inches thick, so 1½-inch screws are ideal. There’s the risk of these screws perforating the Interra below, but as we discussed, the potential energy loss stemming from such a puncture is negligible considering the second layer of Interra further down.

Don't miss a thing!
Subscribe for exclusive content, insider industry news and limited edition webcasts.
3. Finished flooring of your choice
Any flooring finish works with this detail. However, over-slab insulation is particularly beneficial for hardwood flooring applications, since it provides a soft barrier between the concrete and the hardwood, which guarantees the warmth and comfort of the floor assembly.
In this episode of The Build Show, Jake talks about slab-top insulation. As seen in other projects, like Matt Risinger’s home, two layers of Halo Interra are applied over the concrete slab, and then two layers of floating Advantech are placed over top. This provides an insulated, sturdy substrate to install hardwood flooring.
Wrapping It Up
Over-slab insulation is a common retrofitting tactic that allows you to preserve the slab and insulate it over top instead of underneath.
However, over-slab insulation is also a wise strategy for new-build homes. It increases the warmth and comfort of the floors, facilitates hardwood flooring applications, improves energy performance, and allows down-set doors.
We hope that the detail provided above will help you plan your next project if you choose to apply insulation to the top of the slab.

